
I apologize on how long it has been since I have stopped to make a post.
Last year (2016) season I decided to try something new. I went ahead and started growing some tomatoes, peppers, lemon basil, lime basil and lettuce outside.
I took 2 of the black and yellow 27 gallon totes from home depot, bought airstones and aerator from amazon. I cut 6 four inch holes in the top of the totes, then placed the plants in. I had 10 total plants (I used 1 open hole in the top to check water levels, ecc, pH, etc.
The tomatoes grew to 12+ feet, the peppers over 6, and the lemon basil was amazing as usual.
I want to just say that I explained what I was doing to two different people at two disparate hydro shops, both of which said it is impossible to grow hydroponically outdoors.
This is incorrect. Maybe what they were growing is impossible to grow outdoors for legality reasons, or who knows, maybe they just always had that thought. It is incorrect. You can absolutely grow hydroponically out doors. Also, I am expanding my outdoor hydroponics garden this year. I am going from 10 sites, to 30. I am going to do those 10 DWC sites as well as an additional 18 dutch buckets.
I will create DIY sections for each of the projects. Depending on funds, I may make an Ebb and Flow rail system this year as well which would be an additional 30+ sites.
We will see.
I have my tomatoes, and pepper seeds started as well in preparation for the buckets! I am super excited for this growing year and I hope you are as well!
More to follow!
Thanks!
Sunday, February 5, 2017
Monday, July 25, 2016
More exciting posts coming soon!
Hey all!
Sorry my updates have been so sporadic, but more updates to follow.
I made a fun out doors DIY Deep Water Culture for tomatoes, peppers, basil, and lettuce.
More to follow of course!
Sorry my updates have been so sporadic, but more updates to follow.
I made a fun out doors DIY Deep Water Culture for tomatoes, peppers, basil, and lettuce.
More to follow of course!
Thursday, January 14, 2016
Ebb and Flow Update
The last three posts that were made were on an Ebb and Flow system. I wanted to follow up on the update of that system:
Day 1 in system: (4 days after seed germination)
Day 35: (I did add a lot of new plants, which are various days/weeks)
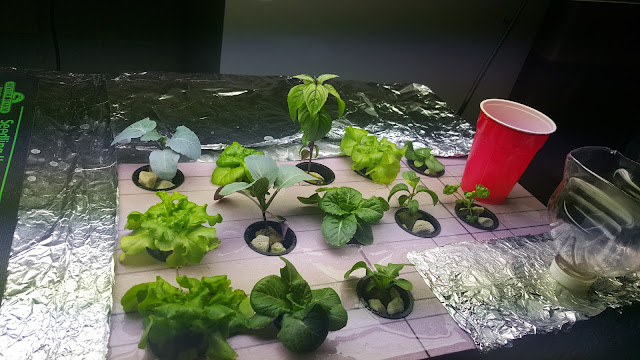
As you can see it is working out quiet nicely! The lettuce is doing well, and the Thai basil is doing really well. The broccoli is also doing outstanding so far.
There are some newer plants in there such as leaf lettuce, romaine lettuce, lemon basil, and curled parsley.
Day 1 in system: (4 days after seed germination)

Day 35: (I did add a lot of new plants, which are various days/weeks)

As you can see it is working out quiet nicely! The lettuce is doing well, and the Thai basil is doing really well. The broccoli is also doing outstanding so far.
There are some newer plants in there such as leaf lettuce, romaine lettuce, lemon basil, and curled parsley.
Thursday, December 17, 2015
First time, beginners DIY guide Ebb and Flow Table setup - Part 3 (Finishing Touches)
- Once you have finished those steps, now you need to decide how far apart you want your net cups. They need to be far enough apart that if you are growing lettuce for example, it has enough width to allow another plant to sit beside it.
- Now you are going to make your marks on the board and begin drilling your holes:


- Special note, just make sure that the hole you create, your net cups fit inside snug.
- Once you have completed this task, you are ready to go.
- Once you have seedlings that are ready to be transplanted over to your new system (around 1-2+ weeks after they sprout) you can place you rockwool cubes into the net cups with the growstones.

- You will want to hand water these plants 2-3 times a day with water from your reservoir until their roots can reach the water during the flood.
- As your plants sprout, and you begin to use this system, make sure that you are covering all holes you are not using so you do not get mold growth.


- Now you are going to make your marks on the board and begin drilling your holes:

- Special note, just make sure that the hole you create, your net cups fit inside snug.
- Once you have completed this task, you are ready to go.
- Once you have seedlings that are ready to be transplanted over to your new system (around 1-2+ weeks after they sprout) you can place you rockwool cubes into the net cups with the growstones.

- You will want to hand water these plants 2-3 times a day with water from your reservoir until their roots can reach the water during the flood.
- As your plants sprout, and you begin to use this system, make sure that you are covering all holes you are not using so you do not get mold growth.
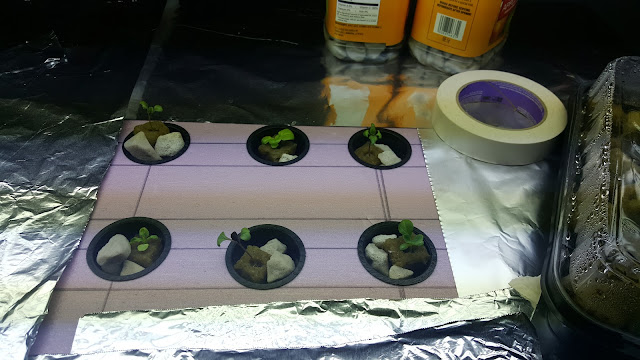
This is right after I transplanted my first six plants into the setup. 3 Basil plants, and 3 lettuce plants. (Cinnamon Basil, Thai Basil, Lemon Basil, ButterCrunch lettuce, Romain Lettuce, and Leaf Lettuce)


First time, beginners DIY guide Ebb and Flow Table setup - Part 2 (Prep Work)
Now that you have all of the supplies your next steps are to get started on your new project!
- First you may want to soak your seeds for 24-48 hours in water, or a mixture of H2O2 (Hydrogen Peroxide)
- While those are soaking you can start drilling holes in your tote. Make sure that you use the whole saw size that is the same size as the ebb and flow fittings. You are going to place two holes in the top of that tote. I placed mine towards the middle. The Mason Mixing tub had a bit of a bow in the center of it, which is fine because that is where the lowest point is located. That means water will flow towards that area when it is draining.
- Remember that the lower ebb and flow fitting is what the pump hooks up to. The taller one is the drain.
- Here is a picture of the Mason Mixing tub on top of my reservoir:

- Once you have those holes drilled in the top of the tote, now you can line up the mixing tub on top of it, and drill those holes.( I took the lid off of the tote, lined up the holes, then drilled them to make sure everything lined up the way I wanted them to line up.
- Next, you will need to put the fittings in. I placed them around the mixing tub. They are free hanging into the tote.
- Here is another picture of the fittings on, and inside of tub:

- After that you can hook up your pump to the pipe, hook that pipe up to the small ebb and flow fitting.
- Next, you will want to fill up your reservoir. This is just for a test run. Make sure you have at least 25 gallons in your reservoir. Turn on your pump, and set a stop watch. Wait for it to get to around 18-19 gallons full, then stop your stop watch. How long did it take to fill up your reservoir? It takes around 8 minutes for mine to fill. Now you can set your timer to that time limit of "on" for 8 minutes.
- I let it flood the table three times a day. You can do two, or more than three if you would like, but I prefer 3 times a day.
- Setup your light, and your hangers. Adjust your light to the correct height (can be as close as around 10-16 inches above the plants).
- Start soaking your rockwool, and growstones.
- Soak the growstones 48 hours in advanced. I soaked my initially in regular tap water in a bucket for 24 hours. Dumped that water, then added pH balanced water, plus 1/4 strength nutrients to the water. Let them soak for another 24 hours.
- The first soak helps remove any dust.
- The second soak preps the growstones for use.
- The rockwool can be soaked 24 hours prior to being used in pH balanced, 1/4 nutrient strength water.
Part 1
Part 3
First time, beginners DIY guide Ebb and Flow Table setup - Part 1 (Item list)
Here is a walk through that I did not have when I first started looking into Hydroponics. A complete, beginning to end documentation of the first Ebb and Flow table I built. It is a rough cost estimate as I waited for a lot of the items to go on sale prior to buying them. The prices below were just what the prices were when I looked them up during the creation of this post.
This series is being created because I remember when I wanted to get into Hydroponics. I did lots, and lots of research into what I wanted, and needed. I thought that I had the list, and boom I started to buy items off of my list. It did not completely fit together correctly. I ran into issues, after issues. I wanted to make a guide to list out ALL of the items needed to not only get into hydroponics, but also build your first setup.
Here is a simple way to create an ebb and flow (flood and drain)table. It is quick, easy, and cheap.
I used very specific items due to durability, and cost. You can choose other options, but it is up to you of course.
Also location pending since you may not have the same stores near you.
1.) Hdx 27 gallon storage tote ($11.97) - Home Depot (Reservoir)
2.) Mason mixing tub 3x2 21 gallon ($12.98) - Home Depot (Flood table)
2.) Mason mixing tub 3x2 21 gallon ($12.98) - Home Depot (Flood table)
3.) 400 gph pump ($22.92) - Amazon
4.) Rockwool ($10.33) - Amazon
5.) Foam topper($5.99 a piece x 2) - I used something similar to this but it was 2ft x 2ft and I snagged two of them - Home Depot (Goes on top of the Flood table)
6.) 100 net cups 2 inch ($11.95) - Amazon
7.) Growstones ($29.99) - local hydro store, or Amazon
8.) Bontanicaire ebb and flow fittings ($8.95) - Amazon
9.) Pipe for the pump ($0.10 per foot) - Local Hydro Store
10.) Timers (13.99)x2 - Amazon
11.) Grow light ($110.00) - Amazon
12.) Nutrients ($37.99) - Amazon
13.) pH up/down ($15.59)- Amazon
14.) TDS meter ($13.99) - Amazon
15.) Power Drill
16.) Whole saw kit (something like this Amazon)
17.) Seeds (Price depends on what you are growing)
17.) Seeds (Price depends on what you are growing)
Total: (Minus the Seeds, Power Drill, and Whole saw kit) = $327.62
There is ways to go cheaper:
- Make your own light. DIY CFL setups can be very cheap. DIY LEDs could be a little cheaper.
- Use something other than Growstones. You could any inert material.(The sky is the limit)
- Only use 1 timer (this means you HAVE to remember to turn on your light, and shut it off.)
- Only buy only the "grow" nutrient instead of the three pack (only if you are growing vegetative items that do not bloom such as lettuce, basil, etc.)
- Skip the TDS meter for now. You can go by how much they describe to put in the water, but these are handy if you start having any issues in your setup, what your water's base is, and what it is after adding your nutrients. It helps you solve too issues of too little nutrient, or issues if your nutrients are too high.
- Skip rockwool, if you have another alternative that is inert and retains water.
**Do note, by changing these variables, you are going to affect the outcome, in which could be negative, or positive.
There is cheaper ways to go about Hydroponics, and if you have the option of a local hydroponic store, they usually have nutrients, timers, pumps, airstones, etc cheaper than Amazon.
If you are already growing hydroponically, or have some of these supplies like I did then it is far cheaper to build an Ebb and Flow table:
1.) Hdx 27 gallon storage tote ($11.97) - Home Depot (Reservoir)
2.) Mason mixing tub 3x2 21 gallon ($12.98) - Home Depot (Flood table)
2.) Mason mixing tub 3x2 21 gallon ($12.98) - Home Depot (Flood table)
3.) 400 gph pump ($22.92) - Amazon
4.) Bontanicaire ebb and flow fittings ($8.95) - Amazon
5.) Timer (13.99) - Amazon
6.) Pipe for the pump ($0.10 per foot (~$1) - Local Hydro Store
7.) Foam topper($5.99 a piece x 2) - I used something similar to this but it was 2ft x 2ft and I snagged two of them - Home Depot (Goes on top of the Flood table)
Total: $83.79
Friday, June 19, 2015
High Pressure versus Low Pressure Aeroponics
High Pressure versus Low Pressure Aeroponics
First off, let's take a quick peek at the definitions of these two difference styles:
High Pressure Aeroponics (HPA) is defined as a form of Hydroponics in which the roots are suspended in a chamber with nozzles that delivers nutrients through a mist to the roots between 5-80 micrometers. Most argue that the range is smaller (20-50 micrometers). This mist is usually derived from some form of pump (typically a diaphragm pump such as a reverse osmosis pump). This type of system usually has a PSI of 80-150PSI to attain the droplet size. Also, it uses specialized misting heads to attain the correct mist droplet size. Research from NASA shows that at the 20-50 micron size, the roots can grab the water/nutrient solution right out of the air and instantly absorb them without any wasted energy.
Low Pressure Aeroponics (LPA), aka soakponics is defined as a form of Hydroponics in which the root zone is suspended in a chamber with nozzles which delivers nutrients through a spray. The droplet size is not exact. These systems typically use a plastic spray nozzle, and a typical fountain pump to get their spray out of the nozzles.
High Pressure Advantages:
Low Pressure Aeroponics Disadvantage:
First off, let's take a quick peek at the definitions of these two difference styles:
High Pressure Aeroponics (HPA) is defined as a form of Hydroponics in which the roots are suspended in a chamber with nozzles that delivers nutrients through a mist to the roots between 5-80 micrometers. Most argue that the range is smaller (20-50 micrometers). This mist is usually derived from some form of pump (typically a diaphragm pump such as a reverse osmosis pump). This type of system usually has a PSI of 80-150PSI to attain the droplet size. Also, it uses specialized misting heads to attain the correct mist droplet size. Research from NASA shows that at the 20-50 micron size, the roots can grab the water/nutrient solution right out of the air and instantly absorb them without any wasted energy.
Low Pressure Aeroponics (LPA), aka soakponics is defined as a form of Hydroponics in which the root zone is suspended in a chamber with nozzles which delivers nutrients through a spray. The droplet size is not exact. These systems typically use a plastic spray nozzle, and a typical fountain pump to get their spray out of the nozzles.
High Pressure Advantages:
- Superior crop
- Of all current methods, this grows plants upwards of 20% faster
- Uses the least amount of water, of any system
- Uses least amount of nutrients of any system
High Pressure Disadvantages:
- If issues arise in the system (power outage) you lose your plants in minutes
- Most finicky form of Hydroponics
- Super expensive
- Clogged sprayers
High Pressure Hydroponics is great for high dollar cash crops, or those seeking the highest quality crop in smaller scale environments / hobbyist
Low Pressure Aeroponics Advantages:
- Simple, easy to DIY
- Grows plants faster than other forms of Hydroponics.
- Cheap to build
Low Pressure Aeroponics Disadvantage:
- If issues arise in the system (power outage) you lose your plants in hours
- Clogged sprayers
There are not very many disadvantages to LPA as you can see above. These systems are not the best for larger plants, but can be used for such. The sprayers can get clogged from the plants roots. These are mainly used for cloning. They do a fantastic job at cloning plants.
Subscribe to:
Posts (Atom)